D.I.Y: How To Make an Ankara Case for your Tab

I know I can be a very creative person but then I haven’t had time for all my knitting and the rest of the things I would have liked to do or learn. I used to draw at some point (*I can copy and paste a drawing but can’t draw straight from my head), well the list is a bit endless. Today I guess the anointing to do something came back, lolz, it certainly came back because I decided I had not gotten my money’s worth from my tab case that decided to give up on me.
The plastic of my tab decided to go a separate way from the back as a result of old age. It is not like it is that old, it is just about a year, so I proposed in my heart that I was not going to buy another, I was going to fix this case. Suddenly the light bulb came on in my head – Ankara! The closest I came close to doing anything Ankara was over the weekend when I learned to wrap a book with Ankara. I remembered I had lots and lots of Ankara 🙂 so I decided to do it!! Yay!!!
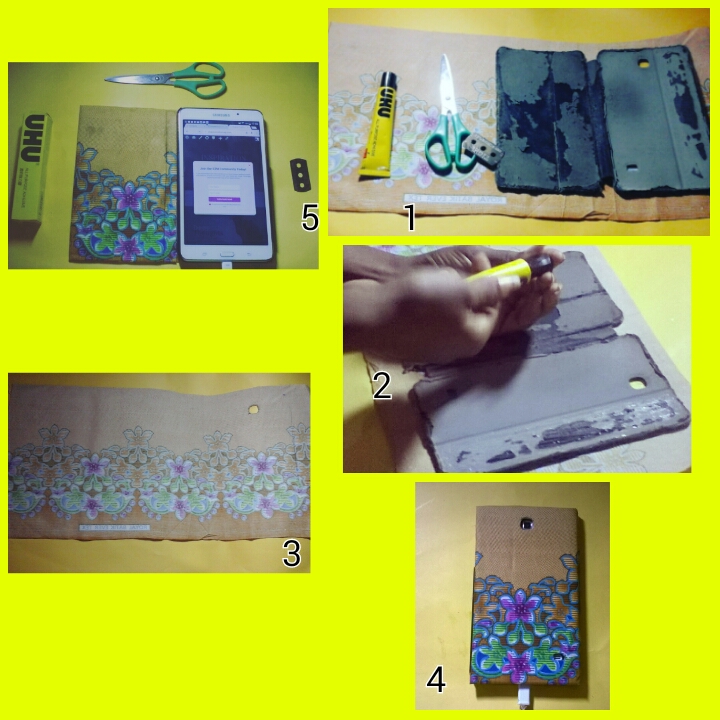
I know it looks horrible right?? But my new case is on point!! The old one was really something else. To make a case just like mine you would need –
- Ankara (but of course)
- Scissors (
you could use your teeth but you would need to file it first) - Blade (
if your nails are as long as mine, you do not need a blade, seriously) - Glue (
your saliva may just work as glue)
Ignore my silly jokes but imagine if you could use your saliva as glue. Okay, don’t imagine that but one of the things I learned early was improvisation. If you don’t have some of these materials, you may be able to improvise. I remember we had a way of making gum with petrol and styrofoam.
STEP ONE
I wrapped the Ankara around my tab case to know the length I needed to cover the old case. I cut the size I needed for the project.
STEP TWO/THREE
I needed to create the hole for the camera and the speaker, so I placed the back of the previous case and I used it to measure the space of the hole, this time instead of using scissors I used a blade to get the perfect shape I wanted.

STEP FOUR
Then I glued the back of the casing first and wrapped the Ankara at the corners. I also glued the plastic that holds the tab into place after laying the Ankara. Viola!!! My final product. I didn’t take pictures of the wrapping process my hands were too sticky but it isn’t rocket science, it is very easy to do.
STEP FIVE
Take a picture of your tab, open shalomtruthsmag and subscribe! You are now ready to use your tab case
Related Post: Deep Thoughts: Don’t Throw That Trash Away!!!